Spring Boot 프로퍼티 설정하기
Spring Boot 프로퍼티 설정하기
Spring Boot의 프로퍼티 설정 방법에 대해 정리한 내용입니다.
1. properties 파일 설정하기
Spring Boot의 프로퍼티 파일에서는 관련 설정과 정적인 값들을 key value 형식으로 관리할 수 있습니다. 프로퍼티 파일은 기존 스프링 프레임워크의 복잡한 XML 설정을 하나의 파일로 설정할 수 있도록 해줍니다.
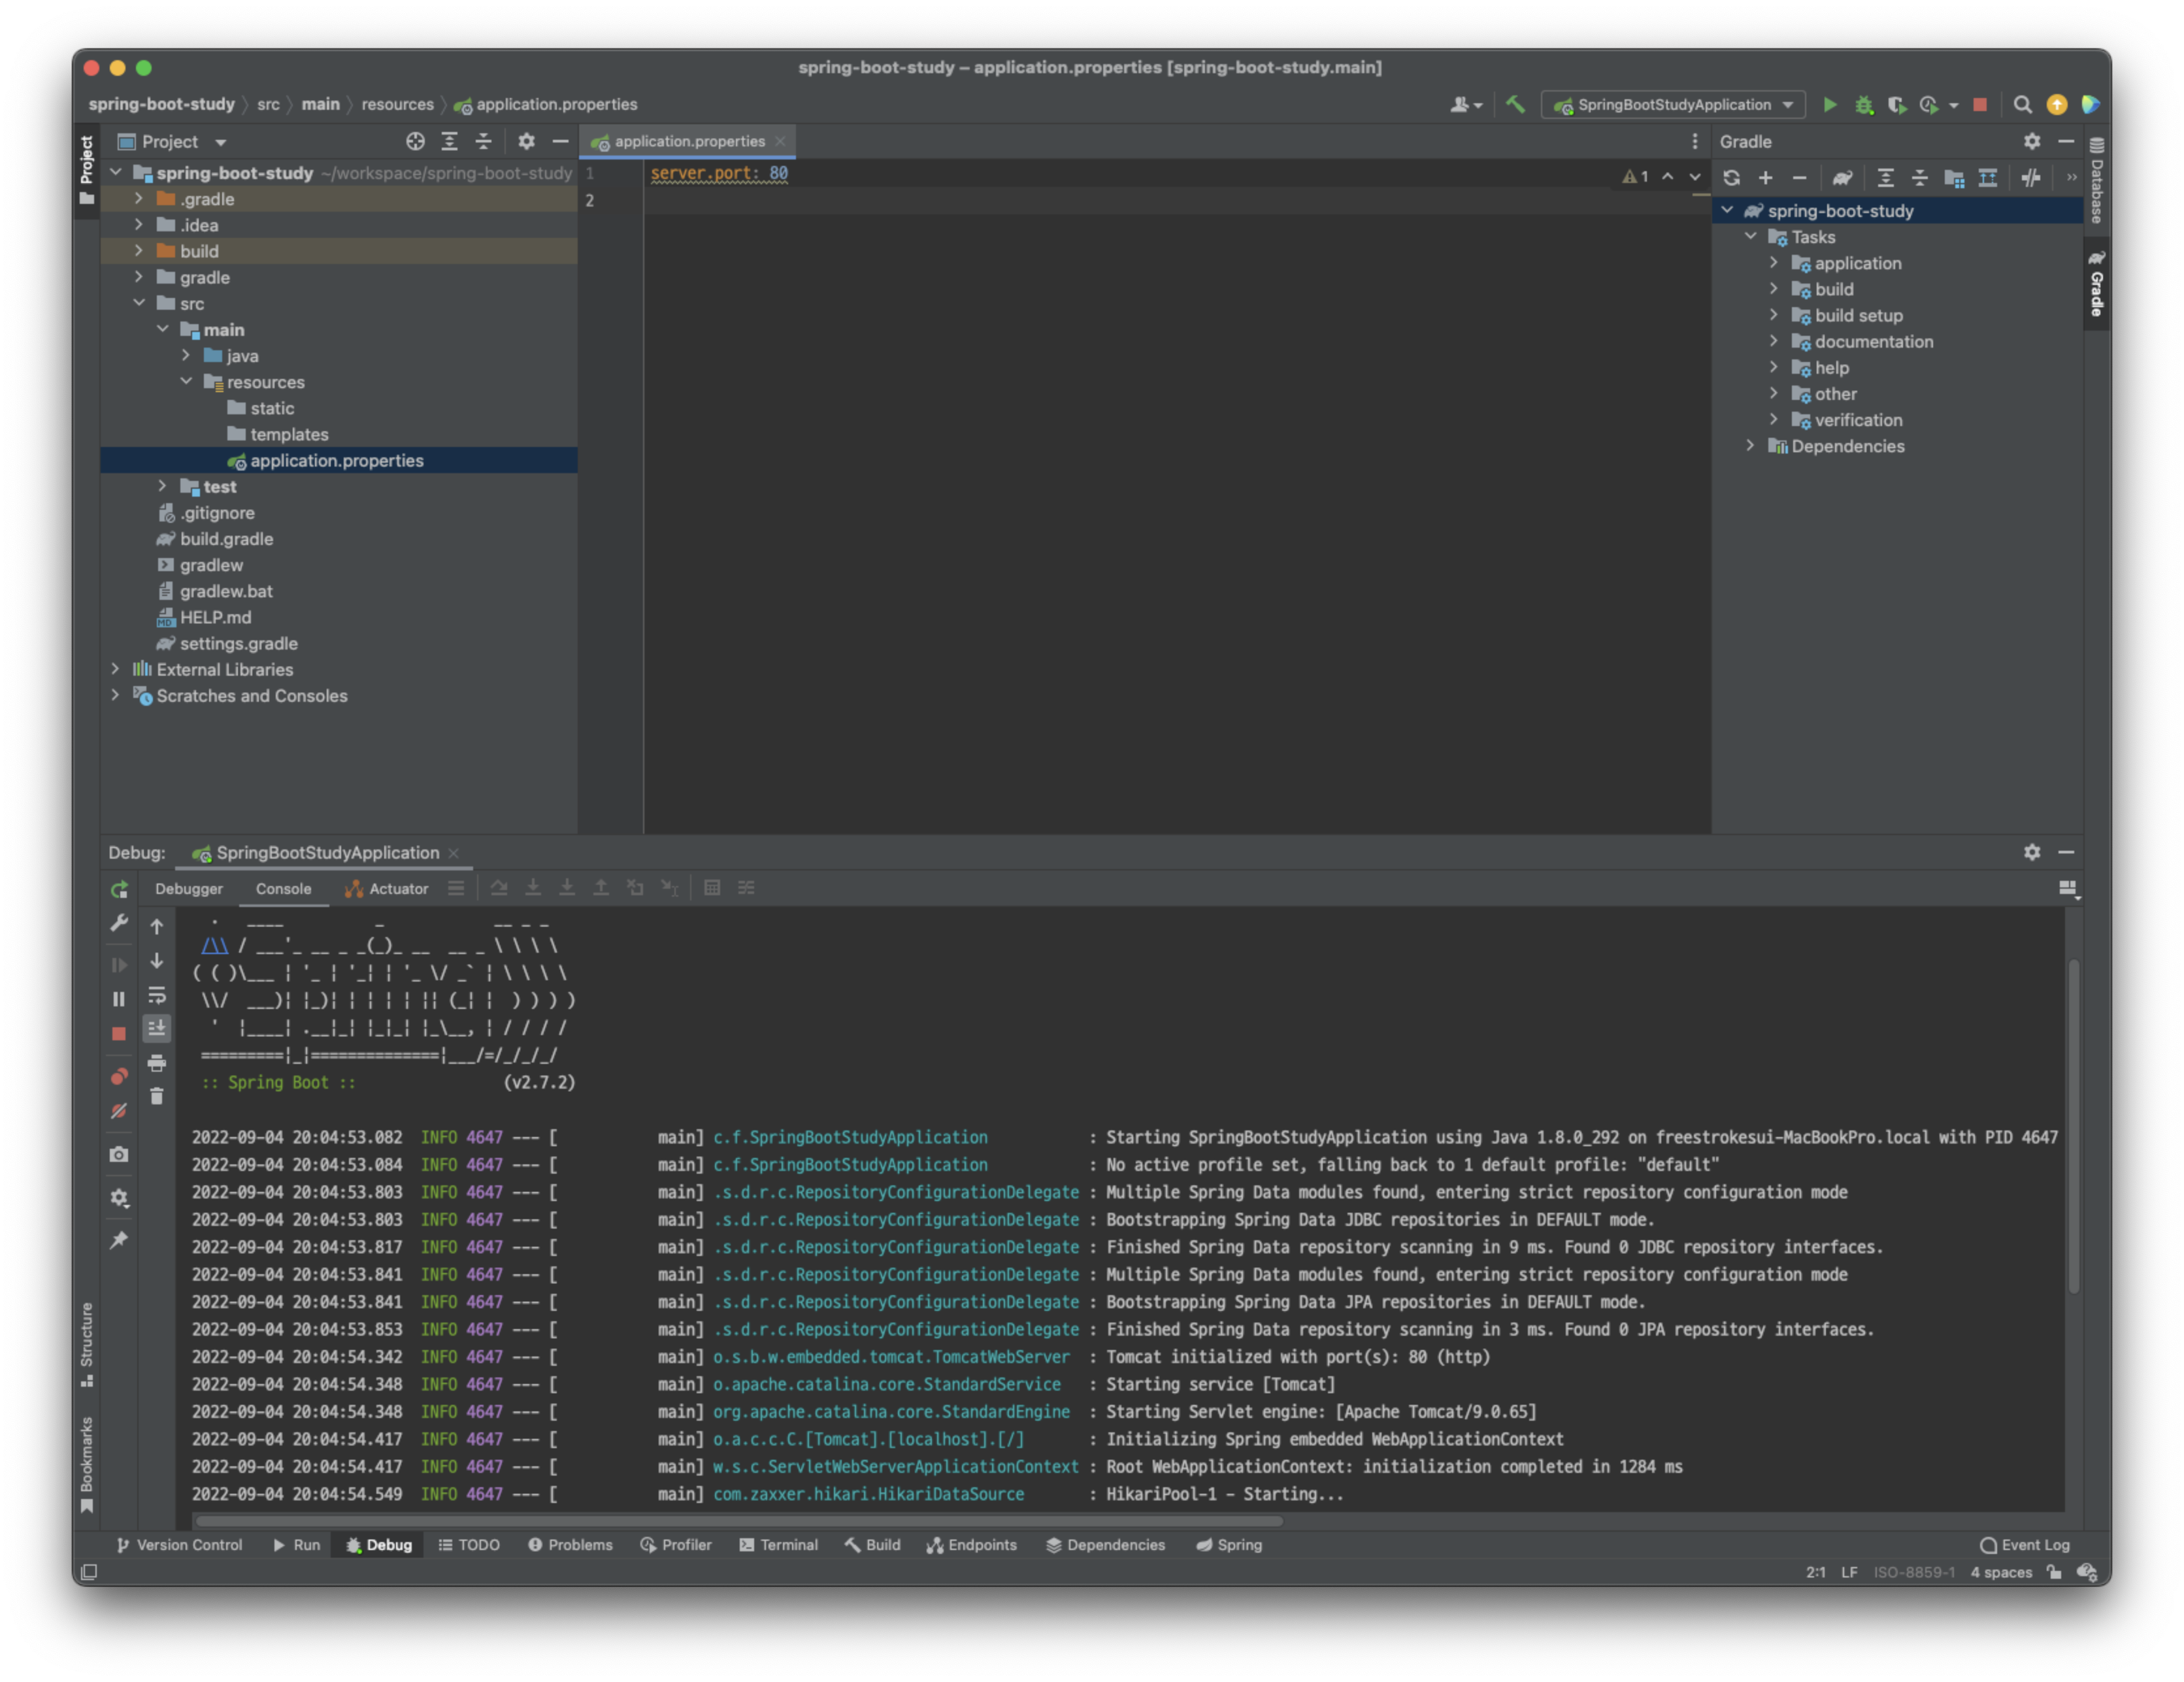
Spring Boot에서 기본으로 사용하는 프로퍼티 파일은 src/main/resources 경로에 있는 application.properties 파일입니다. 간단한 예시로 서버의 포트를 80번으로 변경하고자 한다면 다음과 같이 작성하고 서버를 실행해주면 됩니다.
server.port: 80
2. yaml 파일 설정하기
Spring Boot의 설정 파일로 기존에는 .properties 파일을 많이 사용했지만 표현의 한계로 인하여 최근에는 YAML 파일을 더 많이 사용합니다. YAML(YAML Ain't Markup Language) 파일은 '마크업 언어가 아니다' 라는 뜻으로 마크업이 아닌 데이터 중심의 문서라는 것을 의미합니다. 가독성이 좋고 이해하기 쉬운 문법으로 작성할 수 있습니다.
YAML 파일의 사용을 위해서 application.properties 파일을 삭제하고 같은 경로에 application.yml 파일을 생성해줍니다. 앞서 설정해본 것처럼 서버의 포트를 80번으로 변경하기 위해 아래와 같이 내용을 작성해줍니다.
server:
  port: 80

YAML 설정을 하려면 SnakeYAML 라이브러리가 포함되어 있어야 하지만 spring-boot-starter에 SnakeYAML 라이브러리가 내장되어 있어서 별도의 설정없이 .yml 파일의 사용이 가능합니다. 참고로 application.properties 파일과 application.yml 파일이 모두 생성되어 있다면 application.yml 파일만 오버라이드되어 적용됩니다.
2.1 Profile에 따른 환경 구성 분리
Spring Boot를 이용하여 실제 서비스를 개발할 때 DB의 경우 로컬, 개발, 운영에 따라 각각의 설정값이 모두 다를 수 있습니다. 이러한 경우엔 Profile에 따라 프로퍼티를 다르게 설정해줍니다.
하나의 YAML 파일에서 프로퍼티를 분리하기 위해서는 다음과 같이 --- 기호를 사용하여 값을 나눠줍니다.
server:
  port: 80
---
spring:
  profiles: local
server:
  port: 8080
---
spring:
  profiles: dev
server:
  port: 8081
---
spring:
  profiles: prod
server:
  port: 8082
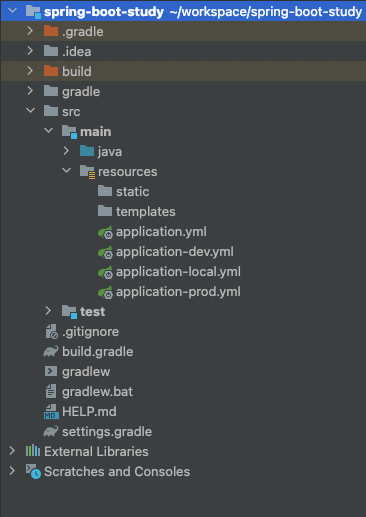
여러 YAML 파일에 Profile별로 나눠서 설정해주기 위해서는 다음과 같이 파일을 분리해줍니다.
애플리케이션을 실행할 때 Profile을 지정해서 실행해주면 해당 Profile의 YAML 설정이 적용됩니다. 실행시 지정한 Profile의 설정이 최우선으로 적용되고 나머지 프로퍼티들은 application.yml의 설정으로 적용됩니다. 따라서 기본 또는 공통으로 사용되는 프로퍼티의 설정이 필요한 경우엔 application.yml 파일에 설정해주면 됩니다.
2.2 Profile에 따라 애플리케이션 실행하기
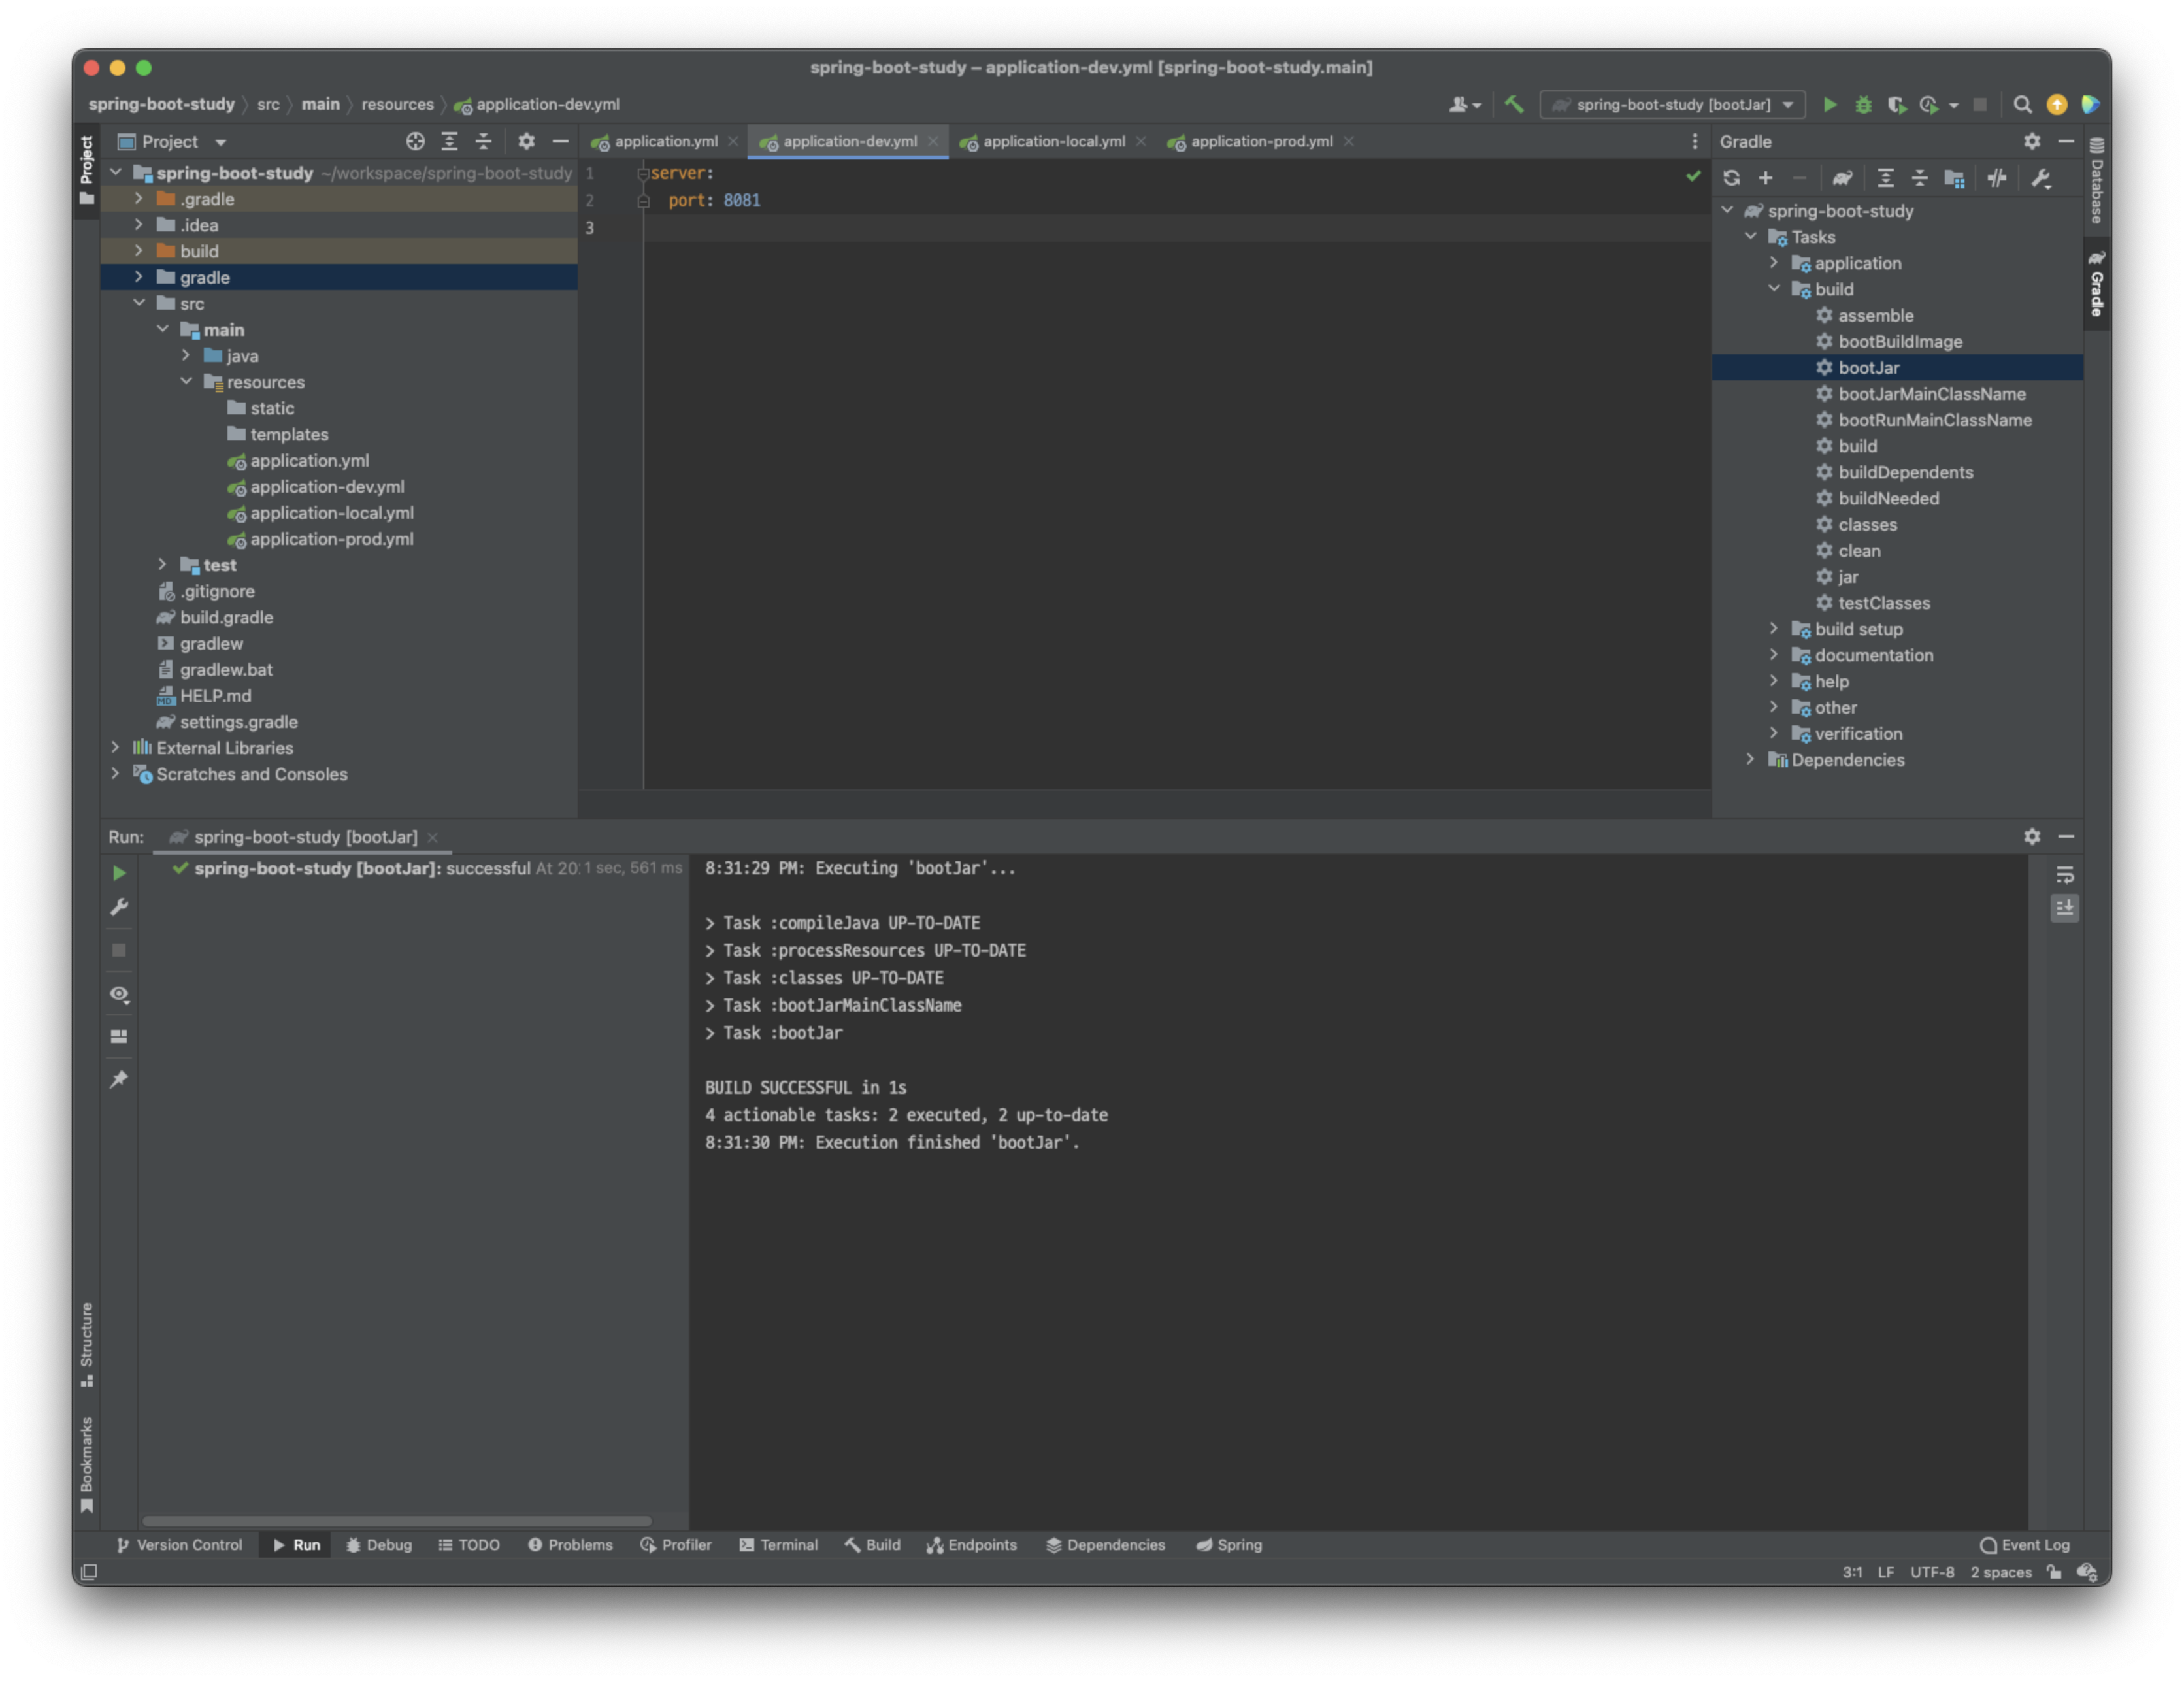
JAR 파일을 이용하여 애플리케이션을 실행하려는 경우엔 gradle의 bootJar를 이용하여 JAR 파일을 생성해줍니다.
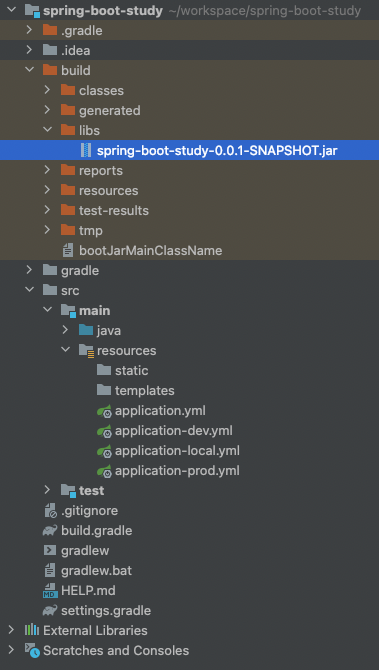
실행 후에 build > libs 경로로 들어가보면 JAR 파일이 생성된 것을 확인할 수 있습니다.
JAR 파일의 실행을 위해선 아래 명령어를 실행해줍니다. spring.profiles.active 옵션의 값으로는 적용할 Profile을 써줍니다.
$ java -jar [파일명].jar -D spring.profiles.active=dev
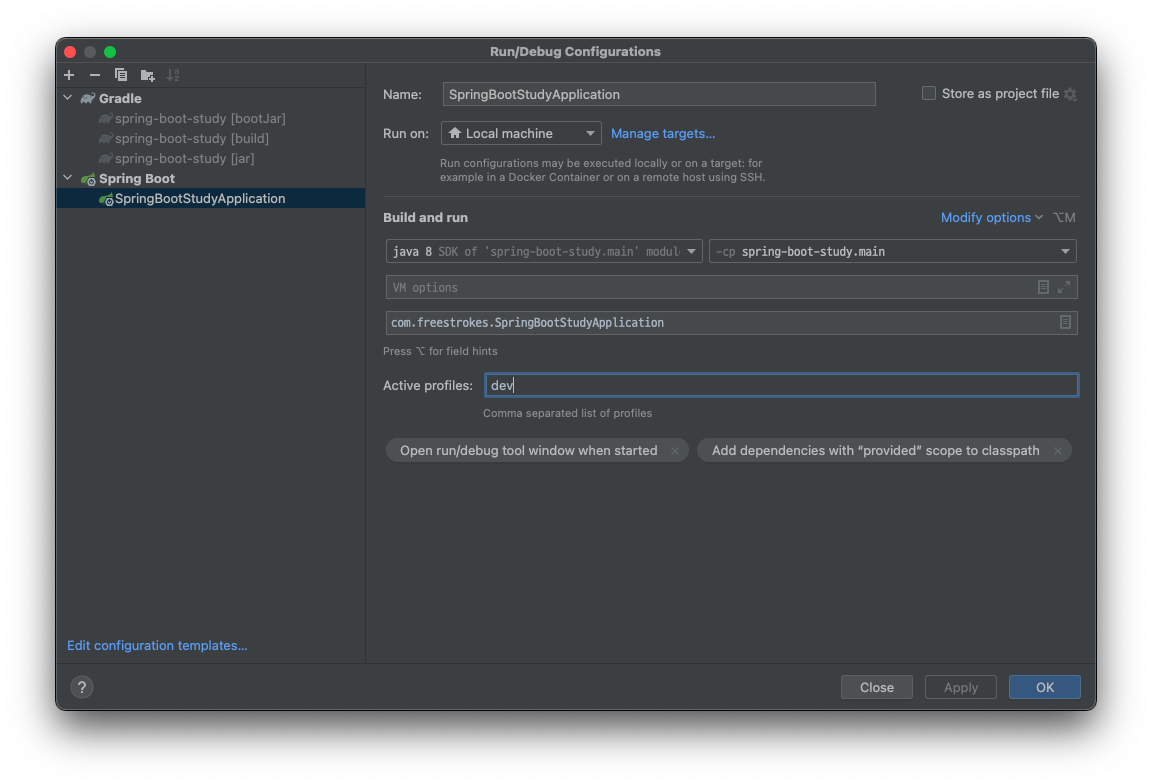
IntelliJ에서 실행하는 경우엔 우측 상단의 Edit Configurations... 메뉴를 클릭하고 Run/Debug Configurations 창에서 Active profiles 값을 설정해주고 실행해주면 됩니다.
3. yaml 파일 매핑하기
YAML 파일을 사용하면 depth에 따라 관계 구분이 이루어지기 때문에 List, Set, Map 등 바인딩 형태의 다양한 매핑을 간편하게 할 수 있습니다. YAML에 있는 데이터를 가져오기 위해서는 어노테이션을 사용해야 합니다. 주로 사용되는 @Value와 @ConfigurationProperties 어노테이션의 특징은 다음과 같습니다.
| 구분 | 유연한 바인딩 | 메타데이터 지원 | SpEL 지원 |
| @Value | X | X | O |
| @ConfigurationProperties | O | O | X |
어노테이션에 대한 각각의 기능을 좀 더 설명하면 다음과 같습니다.
- 유연한 바인딩
낙타표기법(Camel Case)으로 선언한 필드에 프로퍼티 값을 바인딩할 경우 프로퍼티 키는 낙타표기법, 케밥표기법, 언더바표기법 등 다양한 표기법을 사용하여 바인딩이 가능 - 메타데이터 지원
프로퍼티 키에 대한 정보를 메타데이터 파일(JSON)로 제공 - SpEL(Spring Expression Language, 스프링 표현 언어)
런타임 시점에 객체 참조에 대해서 질의, 조작하는 기능을 지원.
메서드 호출 및 기본 문자열 템플릿 기능을 제공
3.1 @Value 사용하기
YAML에서 설정한 키값을 @Value의 프로퍼티로 지정해주면 해당값을 필드값에 매핑하여 사용할 수 있습니다. application.yml 파일에 다음과 같이 프로퍼티를 추가해줍니다.
property:
  test:
    name: property depth test
propertyTest: test
propertyTestList: a,b,c
다음으로 AutoconfigurationApplicationTests.java 클래스를 /test/java/com 하위 경로에 아래와 같이 생성해줍니다.
import org.junit.Test;
import org.junit.runner.RunWith;
import org.springframework.beans.factory.annotation.Value;
import org.springframework.boot.test.context.SpringBootTest;
import org.springframework.test.context.junit4.SpringRunner;

import java.util.List;

import static org.hamcrest.Matchers.is;
import static org.hamcrest.MatcherAssert.assertThat;

@RunWith(SpringRunner.class)
@SpringBootTest
public class AutoconfigurationApplicationTests {

    @Value("${property.test.name}")
    private String propertyTestName;

    @Value("${propertyTest}")
    private String propertyTest;

    @Value("${noKey:default value}")
    private String defaultValue;

    @Value("${propertyTestList}")
    private String[] propertyTestArray;

    @Value("#{'${propertyTestList}'.split(',')}")
    private List<String> propertyTestList;

    @Test
    public void contextLoads() {
        assertThat(propertyTestName, is("property depth test"));
        assertThat(propertyTest, is("test"));
        assertThat(defaultValue, is("default value"));

        assertThat(propertyTestArray[0], is("a"));
        assertThat(propertyTestArray[1], is("b"));
        assertThat(propertyTestArray[2], is("c"));

        assertThat(propertyTestList.get(0), is("a"));
        assertThat(propertyTestList.get(1), is("b"));
        assertThat(propertyTestList.get(2), is("c"));
    }

}
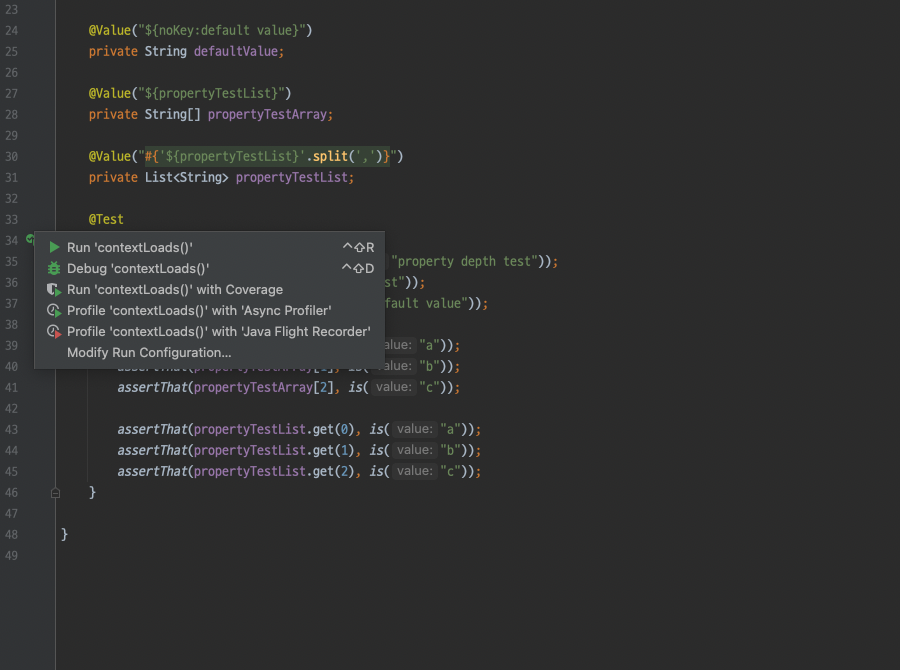
@SpringBootTest 실행을 위해서 맥에서는 Control + Shift + R, Window에서는 Ctrl + Shift + F10 키를 눌러줍니다. 또는 작성한 클래스를 직접 실행하거나 @Test 어노테이션이 사용된 메서드에서 Run 버튼을 눌러 실행해줘도 됩니다. 실행 후 정상적으로 테스트가 완료되면 OK 메시지가 표시됩니다.
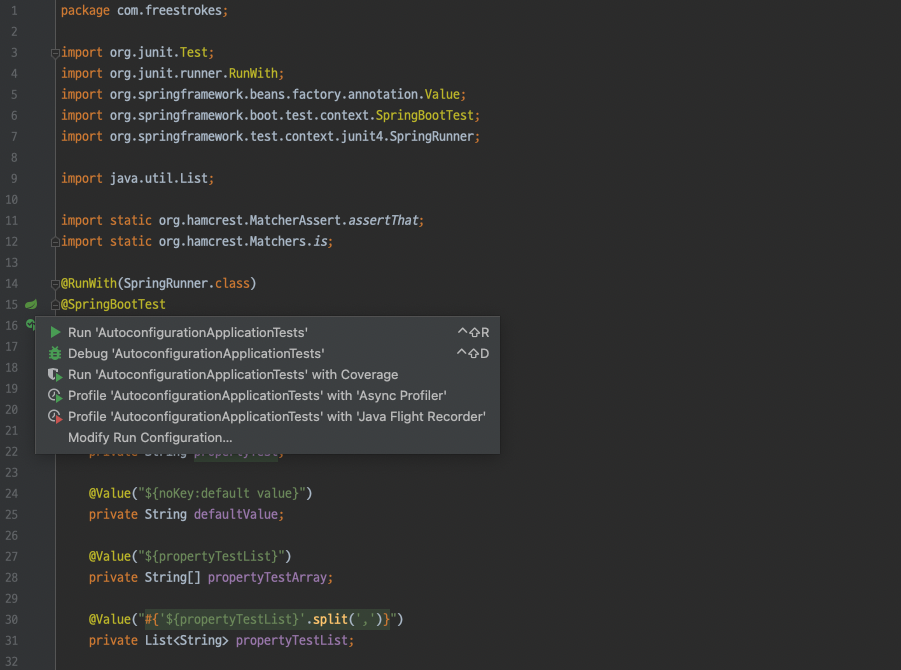
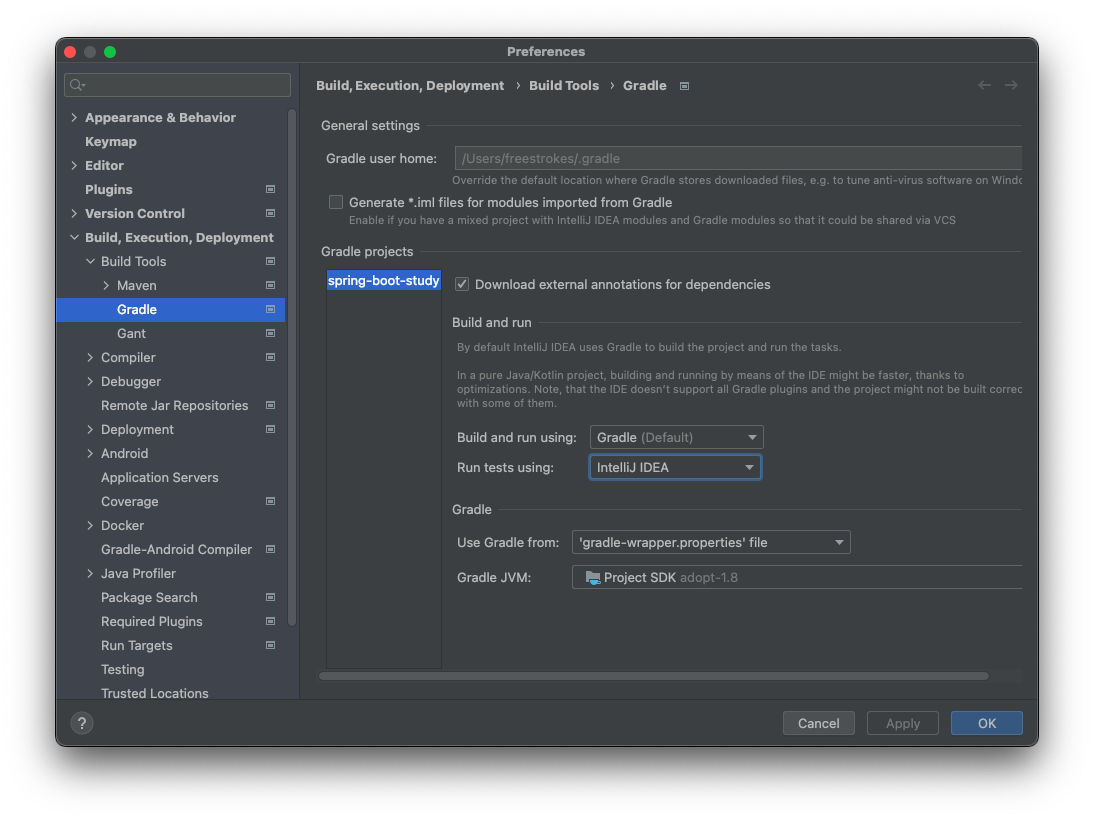
Run 버튼을 클릭했을 때 일치하는 클래스나 메소드명이 나타나지 않는다면 IntelliJ의 설정을 다음과 같이 변경해줍니다.
예제에서 사용된 @Value의 매핑 방식은 다음과 같습니다.
- @Value("${property.test.name}")
depth를 '.' 으로 구분하여 키값을 매핑 - @Value("${propertyTest}")
단일 키값을 매핑 - @Value("${noKey:default value}")
YAML 파일에 키값이 없는 경우 디폴트 값을 매핑 - @Value("${propertyTestList}")
여러값이 나열된 키값을 배열 타입으로 매핑 - @Value("#{'${propertyTestList}'.split(',')}")
SpEL을 사용하여 구분자를 기준으로 리스트에 매핑
3.2 @ConfigurationProperties 사용하기
@ConfigurationProperties 어노테이션을 사용하면 다양한 타입의 프로퍼티를 매핑할 수 있습니다. 기본적으로 prefix를 사용하여 바인딩합니다. 예제를 통해 List<Map> 타입의 프로퍼티값을 매핑하는 방법에 대해 알아보겠습니다.
application.yml에 아래과 같이 프로퍼티를 추가해줍니다.
fruit:
  list:
    - name: banana
      color: yellow
    - name: apple
      color: red
    - name: water melon
      color: green
다음으로 POJO 타입으로 사용할 Fruit.java 클래스를 /test/java/com 하위 경로에 작성해줍니다.
package com.freestrokes;

public class Fruit {

    private String name;
    private String color;

    public String getName() {
        return this.name;
    }

    public void setName(String name) {
        this.name = name;
    }

    public String getColor() {
        return this.color;
    }

    public void setColor(String color) {
        this.color = color;
    }

}
같은 경로에 FruitProperty.java 클래스도 생성해줍니다. @ConfigurationProperties 어노테이션을 사용하려면 해당 클래스를 @Component로 선언하여 의존성 주입이 가능하도록 해야 합니다. @ConfigurationProperties에는 root prefix를 사용하여 원하는 객체를 바인딩해줍니다.
package com.freestrokes;

import org.springframework.boot.context.properties.ConfigurationProperties;
import org.springframework.stereotype.Component;

import java.util.List;

@Component
@ConfigurationProperties("fruit")
public class FruitProperty {

    private List<Fruit> list;

    public List<Fruit> getList() {
        return this.list;
    }

    public void setList(List<Fruit> list) {
        this.list = list;
    }

}
application.yml이 아닌 다른 YAML 파일의 프로퍼티를 사용할 경우엔 다음과 같이 작성해줍니다.
@ConfigurationProperties(prefix = "fruit")
클래스 작성시 'spring boot configuration annotation processor not found in classpath' 에러가 발생한다면 build.gradle의 dependencies에 다음 내용을 추가해주고 Reimport Gradle Project를 실행해줍니다.
testImplementation 'org.springframework.boot:spring-boot-starter-test'
annotationProcessor "org.springframework.boot:spring-boot-configuration-processor"
테스트를 위해 PropertyTest.java 클래스를 작성해줍니다.
package com.freestrokes;

import org.junit.Test;
import org.junit.runner.RunWith;
import org.springframework.beans.factory.annotation.Autowired;
import org.springframework.boot.test.context.SpringBootTest;
import org.springframework.test.context.junit4.SpringRunner;

import java.util.List;

import static org.hamcrest.MatcherAssert.assertThat;
import static org.hamcrest.Matchers.is;

@RunWith(SpringRunner.class)
@SpringBootTest
public class PropertyTest {

    @Autowired
    FruitProperty fruitProperty;

    @Test
    public void contextLoads() {
        List<Fruit> fruitData = fruitProperty.getList();

        assertThat(fruitData.get(0).getName(), is("banana"));
        assertThat(fruitData.get(0).getColor(), is("yellow"));

        assertThat(fruitData.get(1).getName(), is("apple"));
        assertThat(fruitData.get(1).getColor(), is("red"));

        assertThat(fruitData.get(2).getName(), is("water melon"));
        assertThat(fruitData.get(2).getColor(), is("green"));
    }

}
테스트를 실행하면 Fruit 객체의 getter, setter를 사용하여 프로퍼티값을 읽어오는 것을 확인할 수 있습니다.
3.3 @ConfigurationProperties의 유연한 바인딩
@ConfigurationProperties의 유연한 바인딩은 프로퍼티값을 객체에 바인딩할 때 필드를 낙타표기법으로 선언하고 프로퍼티의 키는 다양한 형식(낙타표기법, 케밥표기법, 언더바표기법 등)으로 선언하여 바인딩이 가능한 것을 의미합니다. 예제를 통해 확인해보겠습니다.
application.yml에 아래과 같이 프로퍼티를 추가해줍니다.
fruit-property.color-name: red
fruit-property.color_name: red
fruit-property.colorName: red
fruit-property.colorname: red
다음으로 아래와 같이 FruitProperties.java 클래스를 작성해줍니다.
package com.freestrokes;

import org.springframework.boot.context.properties.ConfigurationProperties;
import org.springframework.stereotype.Component;

@Component
@ConfigurationProperties("fruitproperty")
public class FruitProperties {

    private String colorName;

    public String getColorName() {
        return this.colorName;
    }

    public void setColorName(String colorName) {
        this.colorName = colorName;
    }

}
앞서 작성한 PropertyTest.java 클래스에 아래 내용을 추가해줍니다.
@RunWith(SpringRunner.class)
@SpringBootTest
public class PropertyTest {

    @Autowired
    FruitProperties fruitProperties;

    @Test
    public void contextLoads() {
        assertThat(fruitProperties.getColorName(), is("red"));
    }

}
테스트를 실행해보면 다양한 형식으로 작성한 프로퍼티명이 모두 바인딩되는 것을 확인할 수 있습니다.
이상으로 Spring Boot에서 프로퍼티를 설정하는 방법에 대해 알아봤습니다.
※ References
- 김영재 지음, 『처음 배우는 스프링 부트 2』, 한빛미디어 (2019), p50 ~ p62. CHAPTER 2 스프링 부트 환경 설정
- junghyun100.github.io, Gradle에서 Jar 파일 생성하기, https://junghyun100.github.io/Gradle%EC%97%90%EC%84%9C-Jar-%ED%8C%8C%EC%9D%BC-%EC%83%9D%EC%84%B1%ED%95%98%EA%B8%B0/
- joochang.tistory.com, [Spring] spring-boot 설정 Tips, https://joochang.tistory.com/87
- wonwoo.ml, Spring boot 2.0 Configuration Binding, http://wonwoo.ml/index.php/post/1921
- j-dev.tistory.com, [Spring Boot/스프링부트] IntelliJ JUnit Test시 No tests found for given includes: [...](--tests filter), https://j-dev.tistory.com/entry/Spring-Boot%EC%8A%A4%ED%94%84%EB%A7%81%EB%B6%80%ED%8A%B8-IntelliJ-JUnit-Test%EC%8B%9C-No-tests-found-for-given-includes-tests-filter